Respect your dinner; idolize it, enjoy it properly. You will be by many hours in the week, many weeks in the year, and many years in your life the happier if you do.
-William Makepeace Thackeray
Memorials of Gormandising
Monday, December 31, 2012
Wednesday, December 26, 2012
The Christmas Nuts

Christmas Nuts, circa 2010

Christmas Nuts, circa 2011

Christmas Nuts, circa 2012
You need these nuts. You really do.
I've been making and loving these nuts at Christmas time for several years, and, because they're so very easy to make, they're a really perfect substitute for cookies and candy and things that take so long to create. They also travel well, stay fresh in a container for a long time, and can also stand to be left out in the open air for quite awhile before getting stale. They're a perfect party favor, an excellent hostess guest, and the most amazing thing to have around the house around the holidays. And lemme tell you -- when these nuts come within a mile of cheese or a salad, pure magic happens. Plus, since they're a little on the savory side, they are a much-welcomed treat during the super-sugary holiday season.
I quintupled this recipe, since I had purchased five pounds of nuts from Costco, and I had lots of candied nut distribution to do! Five pounds will require both a GIANT bowl, approximately five large cookie sheets worth of nuts, and five large Tupperware containers. For distribution to your friends, think glass jars, a handmade ceramic bowl, or a ribboned box. Seriously, friends, put these nuts in a dirty old bedpan and everyone will still devour these them!
Sweet and Spicy Nuts
Recipe adapted from Deb at Smitten Kitchen, who adapted the recipe from Elizabeth Karmel of the restaurant Hill Country
1/3 cup brown sugar
1/2 cup white granulated sugar
2 teaspoons kosher salt
2 teaspoons cayenne pepper
2 teaspoons ground cinnamon
1 pound unsalted nuts (I use almonds and pecans, but practically any nut works)
1 egg white, room temperature
1 tablespoon water
1/2 cup white granulated sugar
2 teaspoons kosher salt
2 teaspoons cayenne pepper
2 teaspoons ground cinnamon
1 pound unsalted nuts (I use almonds and pecans, but practically any nut works)
1 egg white, room temperature
1 tablespoon water
Notes:
Give these amounts of ingredients a try with a small batch, and you'll get an idea of how you want them to taste. The original recipe called for more sugar, less salt, and less cinnamon than this, and I shifted things a bit to make them a bit more savory and salty. Honestly, I could stand for them to be even less sugary, but I've made these for a lot of folks who love them just the way they are! In terms of spice, you can use paprika instead of the cayenne if you wish, and if you stick with the cayenne, you'll really need quite a lot of it to conquer the sugar!
Monday, December 24, 2012
Today's Jams

Tupperware wishes you the best of the season with an exclusive collection of classic music to celebrate the warmth and joy of the holidays.
A wide range of songs, from traditional carols to contemporary ballads, sets the mood for the joyous spirit of this special time of year. Featuring some of America's best-loved performers, this star-studded collection is destined to be passed down from year to year as a family favorite, to treasure and enjoy throughout the holidays. Especially for you. Especially from Tupperware.
To celebrate the season!
Arthur Fiedler & The Boston Pops Orchestra – Sleigh Ride
Dolly Parton – White Christmas
Perry Como – Medley: Caroling, Caroling; The First Noel; Hark! The Herald Angels Sing; Silent Night
Johnny Mathis – Let It Snow! Let It Snow! Let It Snow!
Alabama – Santa Claus (I Still Believe In You)
Side Two
Nat King Cole – The Christmas Song
Anne Murray – Winter Wonderland
Jose Feliciano – Feliz Navidad
Elvis Presley – I’ll Be Home for Christmas
Henry Mancini Orchestra and Chorus – Medley: What Are You Doing New Year’s Eve; Auld Lang Syne
Tuesday, December 18, 2012

Monday, December 17, 2012

Saturday, December 15, 2012
Going On A Date

I'm still on this simple-cookie, non-traditional-cookie, not-so-sugary-cookie, easy-cookie mission. And I have a new one. Dates, thank you AGAIN for all you have done for me!
German Chocolate Cookies
2 C pitted dates
1 C oats
1/2 C chopped pecans
1/2 C shredded coconut
1/4 C cocoa powder
pinch of salt
chocolate or white chocolate chips, optional
water
Preheat oven to 375 degrees. Add dates, oats, salt, and cocoa powder to the bowl of a food processor. Process, adding water by the tablespoon until it forms a thick paste. Add pecans and coconut and process some more, adding more water if necessary. (You'll want everything to glide around the bowl of the food processor with a relative amount of ease, but the mixture should still be thick like cookie dough.) Taste the dough, and add more of any ingredient if you see fit.
Use a cookie dough scooper to forms balls of dough. Place on a parchment-lined cookie sheet and press each one gently to make a disk. Stud each one with chocolate chips, if you like. (Cookies can be placed close together, since they won't expand much during baking.) Bake 15 minutes or until set. Cool and store in an airtight container in the fridge. These cookies have a very long life in the fridge, and are perfect for breakfast, lunch, or snacks.
Wednesday, December 12, 2012
You're Everything I Need*

*This is such a great tool for people who are without those really rare, hard-to-come-by cracking surfaces, like countertops and bowl edges. Also REALLY good for folks who live in places that are too soft to crack eggs anywhere, like in a cloud, or inside a pancake, or in a cotton ball. And useful for those who live in regular places, but like to crack their eggs into the air, rather than into a bowl. And, let us not forget that it's easy to carry, which means you'll never ever have to leave home without your easy egg cracker!
Relief is ours, friends. Relief is ours.
Sunday, December 9, 2012
Soup For Your Woes

Happy Sunday! Don't you think you could use some soup right about now? For your deciding purposes, let's reflect on the reasons why soup is amazing:
•You can make a soup out of absolutely anything.
•No, really. I've been thinking about this. If you have at least an onion, you can make a soup.
•There are so many kinds of soup that the average human doesn't usually get sick of soup until April.
•It's lunch! It's dinner!
•It's easy to pack and reheat.
•It's better, as you know, when it's a leftover.
•It's an opportunity/excuse for consumption of carbohydrates.
•Every soup recipe creates 100 gallons of soup.
•All of your food groups fit inside soup.
•Soup is so good at being frozen!
•Spoons are my favorite utensil. Soup needs spoons, just like I do.
I started making a really incredible soup a few months ago, and I have been so excited to share it with you. Here's the back story: when Andy and I were in Bloomington, Indiana visiting his alma mater at the end of September, we went to his favorite soup spot downtown with our friend Eoban. It's called Darn Good Soup (cute, right?) and it's tiny, but I suppose soup restaurants really only need to be big enough to hold some big pots and some bowls, you know? They had tons of soup. Tons. The soup both of the boys went for immediately? Tortilla soup. Now I, being no fool at all, ordered the same thing but braced myself, as I've never met a tortilla soup that I've loved. But this soup changed my mind. Chicken, beans, corn, onion, and a whole mess of other delicious bits. The selling point, though? It's texture. Seriously creamy, and thick, and more like a stew or a chowder than a soup. I was sold. I, of course, had to make it immediately.
I began researching tortilla soup that night in bed, and I discovered that the key to a creamy tortilla soup is refried beans, thinned out a bit with the broth. And, when I made the soup, I discovered this to be true. It's substantial and lovely and, as far as soups go, the prep on this one is pretty easy and smooth. If you have had tortilla soup in the past, and you weren't too thrilled about it, I want you to try this one, because the consistency is really different than what you may be used to. I know I always hyperactively declare things EASY ENOUGH FOR A WORK NIGHT!!!, but it's true with this soup. Granted, it'll be even easier on the weeknight when it's already made and all you have to do is pull it out of your fridge or freezer, but it really is doable to make this when you get home from work.
Happy end-of-Sunday, everyone, and good luck with this workweek. You can do it! I believe in you!
Tortilla Soup
4 T unsalted butter OR 4 T olive oil
32 oz can diced tomatoes
32 oz chicken or vegetable broth
16 oz refried beans (I use the fat free kind because I don't really think that refried beans need lard)
1/2 corn (frozen or canned or fresh)
1/2 rotisserie chicken, shredded
1 large onion, diced
4 large garlic cloves, minced
1 heaping T chili powder
1 heaping T cumin
1 poblano pepper, diced
1 jalapeño pepper, diced (unless it's a really crazy hot one -- then use less!)
salt and pepper
Sauté onion and peppers in olive oil or melted butter. When the onions are to your liking (I like to cook the hell out of mine, getting them a little caramelized and pretty darn brown) add cumin, chili powder, and garlic, plus 1/2 t each salt and pepper. Cook, stirring with a wooden spoon, until spices are wet and thick (about 1 minute, maybe a bit longer -- they should be very aromatic). Add tomatoes, beans, corn, and broth, and mix until smooth. Cook through, and then add chicken, plus some more salt, pepper, and heat (red pepper flakes, hot sauce) to taste. That's it! You're done!
Top with cilantro, sour cream or plain Greek yogurt, lime juice, and tortilla chips.
Note about ambitiousness: If you're feeling really adventurous, you can make your own tortilla strips by slicing stale corn tortillas into thin strips and frying or baking them, but this isn't crucial in my book. The beauty of this soup is that it is so incredibly easy, and creating this soup will make you feel really accomplished in the way a cheater might feel after stealing the win in CandyLand, so making chips might suck too much of that glory right out of this project. But making chips might also make you feel like a wizard, in which case you should do it!
Saturday, December 8, 2012

Thursday, December 6, 2012

Sunday, December 2, 2012
My Dirty Habit

What my garlic bowl typically looks like.

Finally, upon cleaning it out one day,
since I -- uh -- needed some garlic.
This is the amount of garlic
that actually lived inside.
Tuesday, November 27, 2012
1 + 1 = MAGIC

I have come upon a spectacular and wondrous thing. With practically zero effort, you can make these cookies and change your life forever! If you have any kind of food allergy or intolerance or issue, you can eat these cookies. If all you have is 20 minutes, you can have these cookies. If you need a quick breakfast or lovely dessert with your bag lunch, then please go make these cookies. If you don't believe that something amazing can be made with a mere TWO INGREDIENTS, then, well, you need to change your way of thinking right away! Please examine the following:
Miracle Cookies
2 ripe bananas, mashed
1 C oats (regular or quick)
Mix bananas and oats.
At this point, you can either keep the dough this way (delicious) or add things* (even more delicious).
Scoop and place on parchment-lined cookie sheet. (Can be placed close to each other -- they don't expand.)
Bake at 350 degrees for 15 minutes or until you see whisps of golden brown on the surface.
___________________ THAT'S ALL!!! ___________________
*For my first-ever batch, I added a handful of walnuts, a sprinkling of dark chocolate chips, some shredded coconut, and some sunflower seeds. Anything that you'd add to a regular bowl of oatmeal will be perfect. Think cinnamon, nutmeg, ginger, candied ginger, dried cranberries or any dried fruit, apple bits, any sort of nut, maple syrup...you get it.
Also, see that note about parchment? Oatmeal is like glue, so use parchment or a well-oiled pan unless you want to see your cookie sheet into the garbage can when you're done with this project!
You can also use pumpkin puree in place of the banana, which is amazing, but I prefer the pumpkin ones with chocolate or coconut thrown in, since it's not nearly as naturally sweet as the banana is.
These are the very best right out of the oven, but they are also very nice several days later. I keep mine in the fridge, but I'd imagine they could exist on the counter, too.
I would like to thank the dear and lovely folks over at The Burlap Bag in Austin, Texas for this recipe. They are the true geniuses. Thanks, guys.
Sunday, November 25, 2012
Hunting Season And More

Reader-friends, I hope you've all had an amazingly satisfying Thanksgiving weekend, full of deer capturing and wildlife taming. As we shift, groaning no doubt, into a new work week, wishing for a vacation from our vacation and grasping wildly for any kind of food that does not resemble a turkey or a pumpkin, I wish you the very best of luck. We're going to need it! I've got a few ideas about how to make the following holiday food-food-food weeks bearable in a safely indulgent way, so stay tuned. Great things are coming down the line. I have so many things I am very much excited to share with you as soon as humanly possible.
And now, acknowledgements, credits, and thanks:
My dad, whose photograph you see above, taken in Suttons Bay, Michigan. All credit goes to you. Perfect find, Dad. (Mom, thanks for being with him when he took this picture. You have always been really good at getting people to places in one piece.)
My family, by blood and by not-blood. You told really great stories at all three of the Thanksgiving dinners I attended, and I love good stories. Topics included, but were not limited to: how big turkeys get, zoo babies, our "real" lives, sporting events whose rules I don't understand, idiots, where penguins live, the point of cities, "the real" Sasquatch, a 30-pack of Miller Lite + blacking out on an airplane, childhood vacations, Glamour Shots, home robbery involving nudity, corn, Communism, and what happens when a house cat goes into a rhinoceros exhibit.
My kitchen. You got me through yet another Thanksgiving preparation. Good job refrigerator, stovetop, oven, dishwasher, pots, pans, utensils, and red table. You did it!
Thanks to you, readers. You are my reason! I would write to you all day, every day if I could.
Full-bellied Thanksgiving warriors, let's all be appreciative of all we have learned and all we have gained this year. And, most importantly, let's honor all that we have lost this year. Our losses shape us more than anything else ever could.
Hurrah for our food and for our everything!
Sunday, November 18, 2012
We're Getting Closer

I had this terrific plan of helping you out so much with your Thanksgiving menu, and I'm just not pulling my weight around here!
For today's installment, I offer you a side dish that will blow your guests' minds: Cauliflower-Parsnip Gratin. It's this perfect bridge between vegetables and cheese, and sort of an amazing substitute for macaroni and cheese (if, for example, you've got some gluten-cautious folks coming to Thanksgiving*). But you can also eat it and pretend like you are eating nutritious vegetables! And, because it's Thanksgiving, you can serve this AND macaroni and cheese. And a bubbling cauldron of melty cheese. And a cheese-covered turkey. And cheese-covered cheese. Goodness gracious, it's a Thanksgiving miracle!
Cauliflower-Parsnip Gratin
1 smallish head cauliflower, cut into bite-sized florets
3 medium parsnips (more or less if you'd like)
4 T unsalted butter, divided
3 T all-purpose flour
2 C hot milk
1/4 t grated nutmeg
1/2 C gruyere, cheddar, or gouda (or a combo!)
1/2 C grated asiago cheese
1/2 C grated parmesan cheese
1/3 C fresh breadcrumbs
salt and pepper
Preheat the oven to 375 degrees.
Cook the cauliflower florets and parsnips in a large pot of boiling salted water for 4 minutes, until tender but still firm. Drain. (You can also steam the cauliflower in the microwave!)
Meanwhile, melt 2 tablespoons of the butter in a medium saucepan over low heat. Add the flour, whisking constantly for 2 minutes.
Pour the hot milk into the butter-flour mixture and whisk until it comes to a boil. Boil, whisking constantly, for 1 minute, or until thickened.
Off the heat, add 1 teaspoon of salt, some pepper, nutmeg, the gruyere/cheddar/gouda, and the parmesan.
Pour 1/3 of the sauce on the bottom of an 9" x 13" baking dish.
Place the drained cauliflower and parsnips on top and then spread the rest of the sauce evenly on top.
Combine the bread crumbs with the asiago and sprinkle on top. Melt the remaining 2 tablespoons of butter and drizzle over the gratin.
Bake for 25 to 30 minutes, or until the top is browned.
*This entire dish is not completely gluten-free. Obviously. Just wanted to clarify.

Sunday, November 11, 2012
For What Ails You
I've been under the weather this week, sniffling and snuffling through the days, my nose needing assistance every single second, my head foggy, and my malaise reaching sky high levels. You know how this goes.
Mothers know best, of course, and mine tells me to rest and sleep and hydrate my pants off. And I do. But, dear GOD, do I get sick of tea. I love tea, I do. But I reach a breaking point. I know there are other drink choices out there, but here's the thing. I'm an obsessive water drinker when I'm not sick, but the very thought of plain water when I am sick makes me queasy. And juice? For someone as sugar-obsessed as I am, you'd think I'd love the stuff. But no. It's too cloying, too sweet, too much. (Unless it's combined with liquor. Which is a different, more satisfying story altogether.) And soda? Forget it! The too-sweet law applies here as well. This leaves us with very few options, I realize. Which is why, when you are sick, you are to visit the grocery store, where you will purchase some knobs of fresh ginger root and some seltzer water. You will come home, limp your ailing body into the kitchen, slice up that ginger, make yourself a simple syrup with it, and add it to seltzer in any amount you can dream of. Yes! Everyone is happy! Suddenly, you're not quite so sick anymore. It's magic.
This really is a miracle beverage, and I'm predicting that it will be a very large part of my winter beverage collection this year. (Can someone in an important food magazine please pay me to use that horribly pretentious phrase I just made up? My winter beverage collection. Ha! Beautiful.) First of all, store-bought ginger ale is really not my thing, so if it is also not your thing, withhold judgement if you would, and make this homemade ginger ale anyway. It's entirely different, entirely better. Second, everything is better with seltzer water. Bubbles, you know. Bubbles! Third, well, you will soon understand that this ginger ale will be right at home in a cocktail. Andy and I are plotting our Thanksgiving cocktail for this year, and so far, we know this: The Turkey Tail! Featuring ginger ale and liquor! (I'm thinking bourbon with the ginger ale, and perhaps a little bit of mint and orange?) So, family, get yourselves ready for that!
It's incredibly useful to be able to control the amount of sweetness in a soda-type beverage, and that's what you can do with this ginger ale. I've been using a tablespoon or two per pint of seltzer, and it's good, although sometimes just a splash of the simple syrup makes me happy. Oh, and did we mention that ginger is the thing that makes bellies so freaking happy? It's a miracle, this root and this ale. I'm really excited to share it with you. Now, for crying out loud, go get sick so that you can really appreciate the wonder of your very own ginger ale!
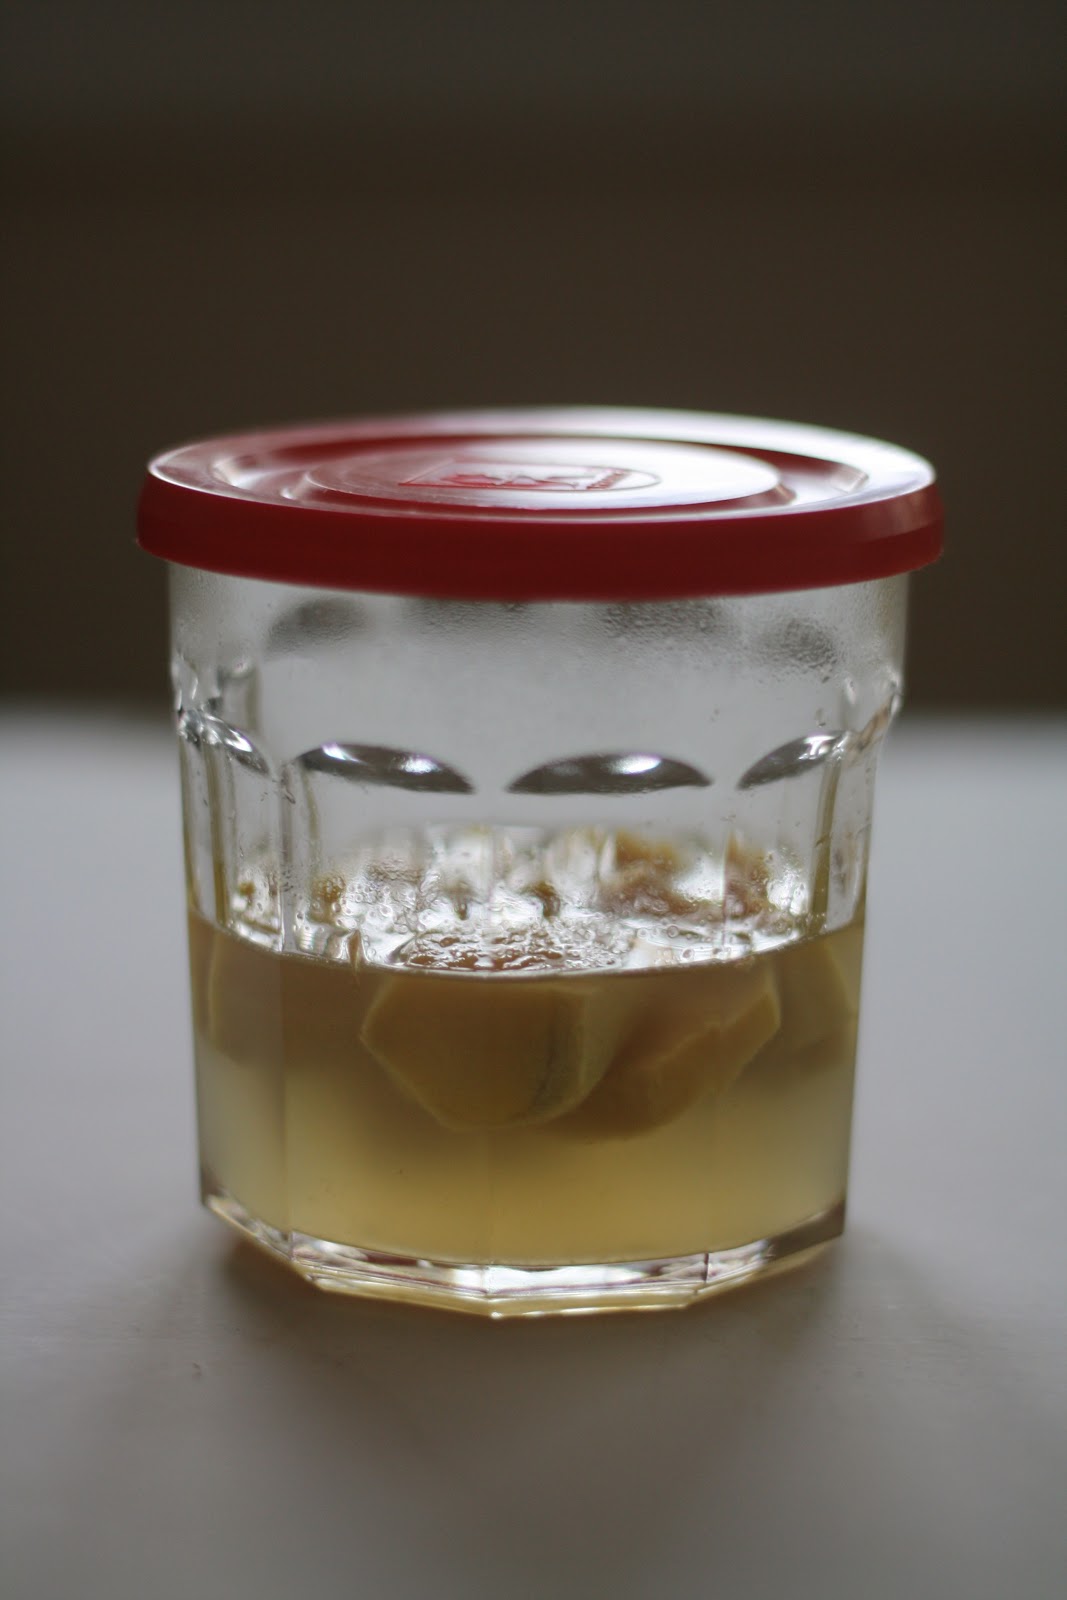
Homemade Ginger Ale
1/2 C sugar
1/2 C peeled, sliced ginger root
1/2 C water
Combine all ingredients in a saucepan and simmer gently, stirring occasionally, for about 15 minutes. Cool. Pull out ginger pieces, place in a glass jar, and strain simple syrup into the jar.
Notes:
You can also just pour the whole panful into the jar for storage -- it's up to you. It will look a little more rustic if you don't strain it, but it's fine for everyday use. I'd suggest straining it if you will be sharing it with guests or using it in cocktails.
This makes enough for either a full pitcher of ginger ale, or 6-8 glasses of the stuff. After I made my first batch of this size, I opted for a much larger amount the second time around. Just double, triple, or quadruple to your heart's content. I also like to add a piece of the ginger to each glass of the ginger ale, but I've also found that you can recycle your old ginger pieces by using them in your new batch of simple syrup.
You can also use honey in place of the sugar, if you'd like. And, while I did sort of bash hot tea earlier, I must say that this simple syrup is killer in a mug of green tea. Or in iced tea. Or in any drink at all, really. Or in a dirty old shoe. Or slurped from an upside-down Lego. (And, ahem, you wonder how I got sick in the first place.) Anyway, bottom line is, you can't go wrong. It's magic.


Saturday, November 10, 2012
We're Getting Ready

So, you know how Thanksgiving is coming up?
And, if you're one of the -- ahem -- lucky ducks out there who gets the privilege of cooking an excessively large meal for everyone you love, then you might have started making a list or two. You might be building a menu and a grocery list and now you're just waiting patiently for me to suggest the perfect thing to have as a hors d'oeuvre. If that is the case, then you are in luck! Here you go. You're welcome! (And even if you aren't even lifting a finger on Thanksgiving except to pop the tabs on a dozen PBRs, then you've now got access to the most seasonal dip on the block. You know, you could really impress the cook if you brought this along to Thanksgiving. I'm just saying.)
Bottom line, pumpkin hummus is here, my November friends. It's brilliant, really. The pumpkin's smoothness translates so well to hummus, since silkiness is, in my opinion, the most important feature of a really great hummus. The true magic, though? It's so incredibly easy you could do it in your sleep. So, you know, just get out these ingredients, close your eyes, and turn on the sharpest blade in the kitchen. Because, like deep-frying our turkeys indoors with little to no ventilation, that's how we do the holidays around here. On the edge, and with a very deep sense of delicious adventure. This is America, after all.
Pumpkin Hummus
1 can pumpkin
2 or 3 T tahini
1-2 t ground cumin
1/8 C olive oil
3 garlic cloves, chopped
juice from 1/2 lemon
salt and pepper to taste
cayenne pepper to taste
nutmeg, cinnamon, allspice (optional)
pumpkin seeds (pepitas)
Combine all ingredients in a food processor. Taste and adjust accordingly!
Notes:
If it's too thick, add a bit more olive oil. If you want it spicier, add more cayenne or red pepper flakes. Also, different folks have different limitations on tahini and cumin, so use the amounts that taste best to you. I love this hummus without the nutmeg, cinnamon, and allspice, so try it without those things first to see what you think. Add pepitas to the top for serving.
This hummus is so versatile, just like regular old hummus. Apply to sandwiches, or just use with vegetables, apples, crackers, or chips. Vrooooom! Thanksgiving is here!
Thursday, November 1, 2012
The Antidote

You're over-sugared. I know it.
A month of pre-Halloween treats, a week of super-intense pre-Halloween treats, and then Halloween itself. Oh, sugar day! I think the rule is: if it's not at least 90% sugar, then you are not allowed to eat it on Halloween. But now today is here, and it is November, and candy is just not as cool as it was yesterday. We're finally allowed to eat things that are NOT made out of sugar, and I am feeling pretty relieved. Vegetables, hang on! I'm coming for you!
For months, I've been meaning to talk to you about how dreadfully sick I've gotten of hearing about kale. Kale this! Kale that! It's so good for you! Eat it every day and you'll never die! Put it in everything! Eat it for every meal! Eat kale or you'll just start rotting away into a nutrition-deprived death-state! I've gotten so tired of being told to eat kale. I was so frustrated, in fact, that I gave up on it. I determined that I really wasn't thrilled with any sort of cooked kale, and I'm now kind of out on the whole kale-chip craze, and, well, I refuse to disguise kale as something else. That said, I do love kale. A lot. Obsessively. I shall now explain!
If you can possibly believe it, the way I learned to love kale was by eating it raw. This sounds a little backwards, I suppose, since kale is at its toughest and least friendly when it's raw, but somehow the rough texture and bitter, grassy flavor really does it for me. Plus, I feel like a dinosaur, chomping on the coarse, wild greens I have just foraged. And we all need to feel a little more like the dinosaurs. (Side note: one of my students today, age 3, explained that he had been a dinosaur for Halloween. Oh, I say, Cool! What kind of dinosaur? He had no idea and was relieved to say YES when I asked, Were you just a regular dinosaur? He then gushed forth about his love for dinosaurs, tripping over his tongue with excitement. I just, I just, I just, I just LOVE dinosaurs! I just love them so much. I love them, I love them, I love them A HUNDRED.)
So, all of this is appropriate considering that the very best kind of kale to use in a salad is lacinato kale, commonly referred to as dinosaur kale, due to its bumpy dark greenness. Curly kale works, but it's just not my favorite for salad. Either way, I feel like lettuce and spinach just need to take seat and relax for awhile, because I just don't need them right now. Get out, other green stuff! I have kale!
Before you embark, I would like to outline what I believe to be the five tenets of kale usage in salad:
1. Wash and dry really well. Use a salad spinner!
2. Remove ribs and any super-thick veins (eww, this is starting to sound gross).
3. Cut leaves in half lengthwise and then into half-inch wide strips.
4. Always toss with the dressing. Never serve it on the side or you will choke from leaf stiffness.
5. Don't toss the salad with utensils! Use your hands to work the dressing into the leaves.
Now then. Let's see about these recipes.
In order to get ready, I would recommend getting yourself some nice red wine, a rotisserie chicken, some good bread, and perhaps some soft, lovely cheese, like a brie or such. This will be the meal that accompanies the kale salad, and you will be so happy. Both recipes serve two, so feel free to double or triple or quadruple for a crowd. Once you get more accustomed to these recipes, you may want to add some other ingredients. You'll see carrots, chicken, and croutons in my photograph above -- that was a lunch salad that ended up having the chicken in it, rather than accompanying it. Add some extra things if you want, but try not to overdo it! The simple flavors of these two salads are perfect as is, so no need to gild the lily. Or gild the kale, as it were.
Also, may I say this in reference to your squirms when you see the word "anchovies" in this first recipe? Once upon a time I thought that I didn't like anchovies, either! Well, it turns out that I was wrong. They've been given a bad name, I'm afraid, and it's just silly. Tiny fish are so important! Anchovies are amazing, and they will give this salad an incredible flavor that you can't get from anything else. Buy the anchovies. Use the anchovies. You will not be sorry.
Kale Salad #1
1 small bunch lacinato kale, ribs removed
3 anchovies, bashed into a pulp by way of mortar and pestle (or chopped and smashed using any other kitchen tool you'd like)
2-3 cloves garlic, minced
8-10 Medjool dates, finely chopped (get the pitted kind)
1/4 C olive oil
1/2 T red wine vinegar
salt and pepper
pumpkin seeds for serving
Cut kale into strips as described above. Whisk to combine anchovy pulp, garlic, dates, olive oil, vinegar, and a dash of salt and pepper. Toss kale and dressing together in a big bowl, taking time to make sure all the leaves are coated and saturated with the dressing. Top with pumpkin seeds.
Kale Salad #2
1 small bunch lacinato kale, ribs removed
juice of one lemon
1/2 C grated pecorino
2-3 cloves garlic, minced
red pepper flakes
3-5 T olive oil
salt and pepper
toasted breadcrumbs for serving
Cut kale into strips as described above. Whisk to combine lemon juice, pecorino, garlic, and olive oil, adding salt, pepper, and red pepper flakes to taste. Toss kale with dressing in a big bowl, taking time to make sure all the leaves are coated and saturated with the dressing. Top with breadcrumbs.
Kale + you = best friends forever
Wednesday, October 31, 2012
Now That's Spooky
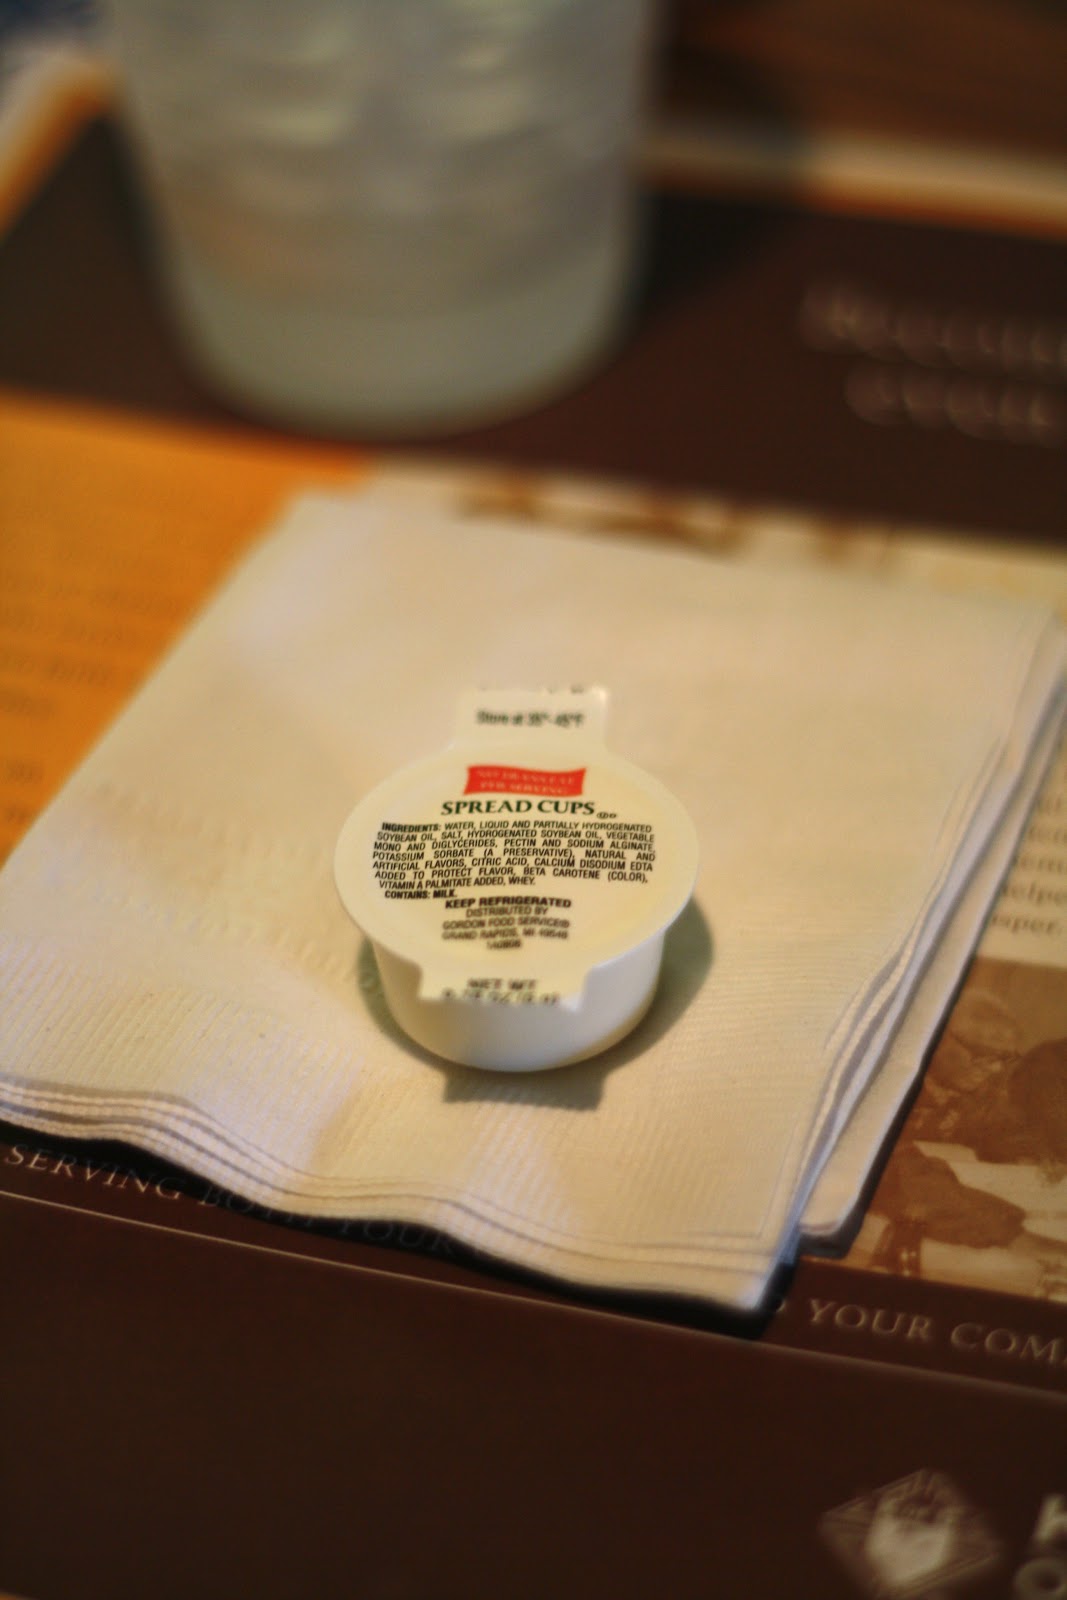
Happy Halloween! Here's a new recipe to try out sometime this week.
SPREAD CUPS
WATER
LIQUID AND PARTIALLY HYDROGENATED SOYBEAN OIL
SALT
HYDROGENATED SOYBEAN OIL
VEGETABLE MONO AND DIGLYCERIDES
PECTIN AND SODIUM ALGINATE
POTASSIUM SORBATE (A PRESERVATIVE)
NATURAL AND ARTIFICIAL FLAVORS
CITRIC ACID
CALCIUM DISODIUM EDTA
BETA CAROTENE
VITAMIN A PALMITATE
WHEY
Combine all ingredients and whip until it looks like something that could possibly pass for butter. Place small amounts into small cups and seal with fun lids that say something like, "SPREAD CUPS." Serve with all meals to your favorite and finest guests.
Monday, October 22, 2012

Sunday, October 21, 2012
Dear Pumpkin,


Well, friends, the joke's on me. Remember my silly comments about all the pumpkin being gone and all then everyone being out of luck because I bought all the canned pumpkin? Okay, so it took me three grocery store trips to get my hands on one single can of pumpkin just so I could make this dreamy cake. Canned pumpkin is sold out EVERYWHERE. It's a hot mess. (And, as it turns out, it's NOT just my fault! There are actually other people out there who are trying to buy pumpkin! Appalling!)
Since I discovered this cake, I've made it twice. It's a big cake, so be prepared to have a lot of cake-loving someones to share it with! I usually find myself surrounded by a zillion pumpkin recipes at this time of year, including a great many breads and muffins and pies. This year, I have found this one, and it, I think, is better than all the rest, and I can say with confidence that this will be my go-to recipe for pumpkin sweets this season.
ROCKtober Pumpkin Spice Pound Cake
thanks to Jenna for this recipe, which I sort of mauled a bit
and thanks to Jason for inventing Rocktober
for cake:
1 C chopped pecans
3 C flour
2 t baking soda
1 t salt
1 T ground cinnamon
1 t ground nutmeg
½ t powdered ginger
¼ t ground cloves
1 C butter, softened
1 C brown sugar
2/3 C white sugar
4 eggs, room temperature
1 can (approx 16 oz.) pumpkin
1 t vanilla extract or vanilla bean paste
for glaze:
¼ C butter
½ C white sugar
2 T water
2 T bourbon or rum
Make the cake!
•Grease bundt pan and sprinkle pecans over bottom.
•Combine flour, baking soda, salt, cinnamon, nutmeg, ginger, and cloves in medium bowl.
•Add eggs and beat well. Add pumpkin & vanilla and beat well.
•Add dry ingredients and mix well. Batter will be thick!
•Spoon batter into pan and drop from 6-8 inches onto a hard surface in order to get the air bubbles out.
•Bake at 325 degrees for approximately 60 minutes, or until a wooden pick comes out clean. (Watch
carefully, as this cake can dry out in the oven very quickly!)
•Allow cake to cool in pan for 10 minutes.
Make the glaze!
•Melt butter in small saucepan, Stir in ½ C sugar and 2 T water, and bring to a boil, whisking constantly. •Remove from heat and pour ½ of the glaze over cake.
•Let cake stand for 5 minutes and then invert onto serving plate.
•Make holes in top of the cake and pour on the remaining glaze.
Friday, October 19, 2012
October With A Spoon

Don't be frightened. Don't be skeptical. There is pumpkin in this chili and it's good. That, and it's easy enough to put together on a weeknight, but also such a fun project that you'll want to make it on a weekend. And did I mention how incredibly autumnal, how amazingly seasonal it is? And how it's perfect for Halloween? And how children will eat it? And how you can freeze it? And how you can serve it to your traditionalist friends who will just think it's so delicious because once they taste it, they will forget all about the presence of fruit and lamb? This chili really benefits from the creaminess of the pumpkin -- it instantly adds texture and thickness that you can typically only get from the refrigeration process, and we all know that you're going to eat this well before it goes into the fridge!
I like to top this chili with sour cream and cilantro, and serve with either crackers, tortilla chips, or a grilled cheese -- specifically a brie and pear grilled cheese, although any kind of grilled cheese is the perfect grilled cheese. If the pumpkin pie spice in the chili makes you nervous, then don't worry! You can leave it out and just make the chili with the canned pumpkin to start with. I also love this chili with ras el hanout, which is an incredible, surprisingly versatile Moroccan spice blend. Now off you go! Make this chili, call in your bear cubs, and feed them all!
PUMPKIN CHILI
1 pound ground lamb (you could also use beef or turkey!)
1 large onion, diced
1 poblano pepper, diced
1 jalapeño, minced
1 cup canned pumpkin
1 (28-ounce) can diced tomatoes
1 (16-ounce) can kidney beans or pinto beans, drained
1 (16-ounce) can chili beans
2 tablespoons chili powder
2 teaspoons pumpkin pie spice
1 teaspoon brown sugar
1 1/2 teaspoons salt
1 1/2 teaspoons pepper
Thursday, October 18, 2012

Monday, October 15, 2012
Persimmon City, Indiana


Hello! Alert! Important news just in!
Persimmons. Have. A. Secret. Life.
Apparently, persimmons aren't just those apple-sized, shiny orange orbs hailing from California or Asia. They grow strangely close to me in, yes, INDIANA. It's true! Granted, they are tiny. And dangerously fragile. And full of giant seeds, which take over the entire fruit and leave only the smallest smidgen of actual pulp. But they're real! And they are available at the farmers market in the autumn in central Indiana. And I'm not kidding. My research reveals that it's called the American Persimmon and it's native to primarily the eastern U.S., although somehow they made their way over to Indiana at some point. It's traditionally eaten in a steamed pudding, although I, being decidedly more practical than that, chose to use the pulp for a cocktail. I mean, why have a pudding when you can have liquor?
Hurrah!
Sunday, October 14, 2012
Eggs-cellent

All meals have just been improved. It's because the 6-minute egg has entered my life, and I'm in love! It's amazing. So keep reading, if you will, and I'll turn you into a wizard.
It's been around forever, this egg style, but I had my first one only recently. This particular 6-minute egg found its way into an incredible, rustic-yet-classy breakfast that Colleen and I had a Lula several Fridays ago. You may find yourself linking over to this restaurant's site and feeling quite seasick because of those godforsaken blinking squares, but if you can get past that, head over to the brunch specials and you'll likely see a 6-minute egg somewhere on the menu (the current one sounds pretty amazing). Ours was served with black quinoa, watercress, some other weeds-worthy green things, obscenely pungent black garlic, a sweet potato pavé, sautéed apples, and some other odds and ends. And it was incredible. The black garlic punched me in the face, but you know how fermented foods are. Is it good? Is it bad? It tastes so good! It tastes so bad! Should I actually be eating this?!
They've quite mastered this egg preparation, I think, and, well, you know me -- I can't have OTHER people mastering things while I stand idly by! So I'm learning. Rather, Andy and I are learning. He doesn't consider himself much of a cook, but he likes the magical process of this egg-cooking method because he is A Science Person. Plus, it's impossibly, beautifully simple, and that means a lot to a guy who thinks that even a frozen pizza feels like a bit too much work sometimes.
The 6-minute egg can be a good main course for breakfast, of course, but it's also the perfect touch for any kind of salad, or as the crown on nearly any type of rice dish. I could see this on greens or grains, Indian food or Thai food, or anytime that your meal needs a little flair or a little punch of protein. Think about serving the egg with a good toast, or polenta, or a nice sauce. I could also see this egg with a meat dish, like with a steak, or pork. Be sure to sprinkle your finished eggs with good salt, pepper, and a little olive oil. It's unexpected, this egg, and really sort of like a treasure.
So, let's talk consistency. The texture of the egg is going to blow your mind. The white is similar to that of a poached egg, so it holds together, but isn't rubbery, and the yolk stays together, but is also quite soft at the same time. The process of spilling your yolk in any type of soft-yolk egg preparation is so satisfying, but often a little too wet for me, so I love this 6-minute method because your yolks will not be completely liquid-like, nor will they be cooked. It's the perfect in-between yolk state, and I do believe you'll love it quite a lot.
6-Minute Eggs
Short version:
Boil water.
Cook eggs for 6 minutes.
Move to ice bath.
Remove and peel.
More-words version:
Start with room temperature eggs. (Hate to break it to you, but this part is really important! If the egg is too cold, it'll crack as soon as it hits the boiling water. But sometimes I cheat by microwaving the eggs for about 15-20 seconds in order to mock room temperature.)
Bring a pan of water to a boil. There should be enough water in the pan to cover the eggs completely. When the water is at a rolling boil, carefully and gently lower your eggs into the water with a slotted spoon. Set the timer for 6 minutes.
Meanwhile, prepare a bowl of ice water, using about two-thirds ice to one-third water. Keep the water boiling the whole time. At the end of the 6 minutes, remove the pan from the heat and quickly remove the eggs from the pan with the slotted spoon. As you remove them from the boiling water, carefully and gently lower them into the ice bath.
Leave in the ice bath for 20-30 seconds, or up to a few minutes. This part of the process will cause the egg white to separate from the shell and make the egg easier to peel. If you keep it in the ice water for a short amount of time, the egg itself will stay warm, and that's what you want (and by that I mean "that's what I want" -- so it's up to you!). Crack the eggs on a hard surface very gently on all sides, and peel off the shells, being careful to not damage the egg at all. Clean off the membrane and any shell bits and serve immediately.
Friday, October 5, 2012
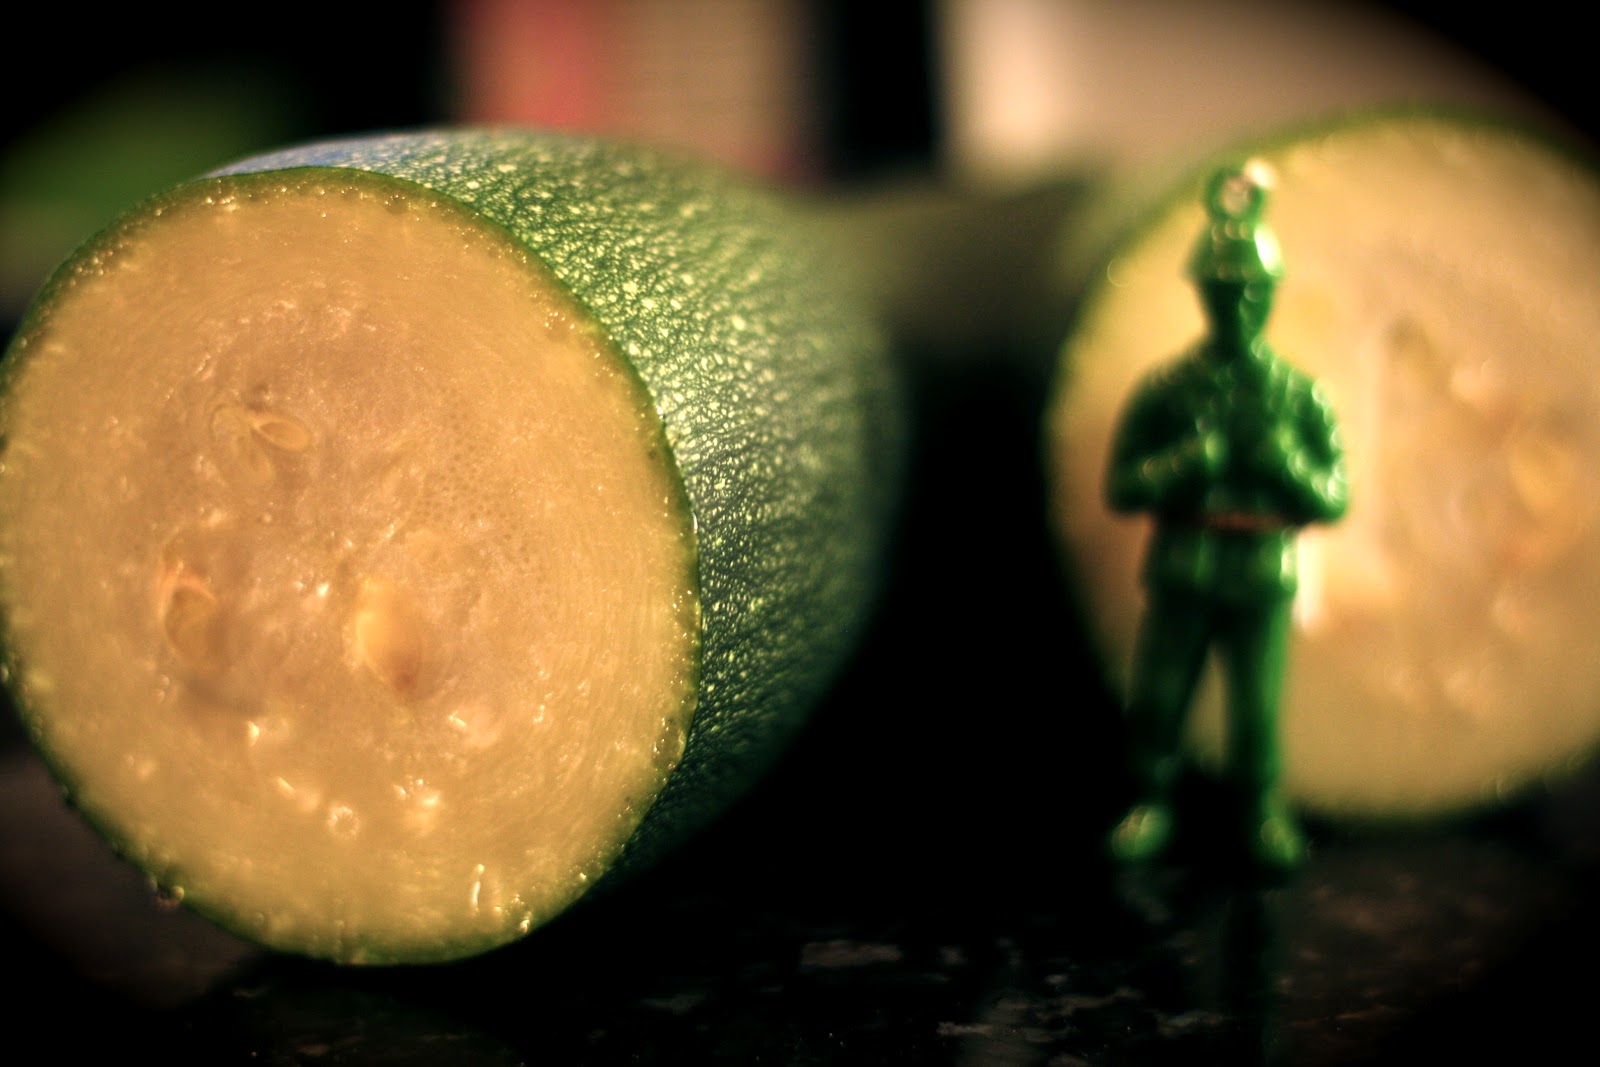
Pumpkin Emergency

The thing is, once October strikes, I just really want to consume pumpkin every single day. September? Nope, too early. November? Totally sick of it by then. So it will make sense to you that I have found a way to consume pumpkin five times within the past five days. Ah, pumpkin! Dog-safe, child-friendly, and ridiculously useful. What could be finer?
I wish I was the kind of person who could say she makes and cans her own pumpkin puree, but that will just never be me. While I tend to go above and beyond the call of duty perhaps a bit too frequently, pumpkin is not one of the areas in which I overachieve. I made my own pumpkin puree just once, and I swore I would never do it again. I mean, come on! Buy pumpkin, carry heavy pumpkin home, clean pumpkin, cut pumpkin, remove innards from pumpkin, bake pumpkin, cool pumpkin, scoop out pumpkin, puree pumpkin. Damn! And all of this for a mere two cups of pumpkin, maybe three if I'm very lucky, which will inevitably become moldy in the refrigerator before I can use it all. So. I make time for lots of absurd and seemingly unnecessary activities, but not for this one.
So this brings us to the pumpkin activity of the day. When I came home yesterday, while (naturally) wearing the pumpkin sticker I applied to myself at school, I made pumpkin smoothies, which is basically a liquified pumpkin pie without the obscene amounts of sugar (necessitated by the fact that I made a pumpkin pie the day before, and we were rendered quite sugared).
It's a darling little recipe, and when I made it, I was reminded how pumpkin is so odd because, by itself, it really doesn't taste like much of anything at all. It's that addition of spices and sugar that makes us think that pumpkin tastes a certain way. Sneaky pumpkins, indeed! So, if I don't manage to use up the world's pumpkin supply after all, and you find yourself with a can of pumpkin, I would recommend poking your spoon in and conducting this blandness experiment. Then, round up your spices and turn that convenient, glorious mush into something amazing!
Pumpkin Smoothies
serves 2
1/2 C pumpkin puree
4 ice cubes
3/4 C vanilla yogurt
1/4 C milk
1/2 t cinnamon
1/4 teaspoon nutmeg
2 T maple syrup
Process in blender, adding extra milk if it gets too thick or refuses to blend. Also, toy around with the amounts of everything so that the taste is to your liking, and make sure you don't overdo it with the spices or it'll taste bitter! Top with whipped cream, of course.
Tuesday, September 25, 2012

Sunday, September 23, 2012
Sugar Bowl Hero
In a klutzy explosion of my body, I dropped a jar onto the sugar bowl from four feet up. Miraculously, the handle is the only part that broke. I did not, however, feel this markedly calm about it when it happened. When someone else breaks something, I am completely cool about it. And every once in awhile when I break something, I'm just as calm, but typically when I break something, I am a complete and utter wreck. And we're not talking just sort of cross. We're talking tragically sad and extremely mad at myself. For example:
Me: (wailing) I hate everything! I'm a horrible, terrible person!
Him: It's okay!
Me: (still wailing) It's not! I'm an idiot! I hate sugar bowls! I hate cabinets! I break everything!
Him: It's okay!
Me: (still not over it) It's BRRROOOOOKKKENNNN!
Him: It's just the handle. Just one handle. It's okay! I'll fix it!
Me: (starting to kind of get over it) But we can't fix it! It's broken!
Him: Let's glue it.
Me: (a little skeptical and sniffly but nevertheless getting out the glue from the cabinet) Okay.
Him: (gluing it) See? It's going to be great.
Me: (needing reassurance) It will?
Him: (happy to assure me) Yes.
Me: It looks better already.
Him: The glue dries white. See? It will look even better than before!
Me: (sniffing one last sniff, just for good measure) It does look (sniff) nice. You're (sniff) nice.
And he then proceeded to hold the handle on the sugar bowl for 31 minutes.
Yes, 31 minutes, folks.
31 minutes!
Because the bottle of glue said it should be held in place for 30 minutes.
Because a rubberband wasn't good enough.
Because he wanted it to dry exactly right.
Because I was sad.
Because he's my sugar bowl hero.


Wednesday, September 19, 2012
It Came, It Went, It's Here
We knew it.
We spent 101 smashing days sweating our pants off, lolling about languidly, considering cantaloupe to be an actual dinner, crunching sand under our bare feet, tracking sand into the house and into the beds and tub and into the slats between the floorboards. We spent 101 days worrying less, cooking less, wearing less, (wishing we were) working less, and forgetting what soup tasted like. We spent 101 days reading more, eating outside more, drinking (ahem) way more, and grilling things we weren't even sure could be grilled. We floated through adventures, sweated through shirts, dried ourselves off in the sun and in front of whirring fans, and ate weekend lunches until 4:00 (at which point we started planning dinner).
We bought too much at the farmers markets, wishing the farmers a good week, offering them hope for rain, and walking wobbily home with bags full of everything we couldn't possibly pass up. We flip-flopped and swimsuited, we got awkward tan lines in silly places, and we picked way more berries than would fit in the freezer. We contemplated canning but settled on just eating it all so that the kitchen wouldn't get any hotter. We took showers in necessary excess, danced to our favorite records hundreds of times, ate corn three times a day, and then whined about our bellyaches with smiles on our faces. We invented ice cream flavors and cocktails that no one else ever thought of, walked everywhere, did entire jigsaw puzzles in one sitting, paid a quarter for the largest zucchini the world had ever seen, and plotted dreams that would carry us into the next summer.
And we knew that it would end. It tends to do that, you know. It's always bittersweet, and even downright sad. But this year? I feel better about it than ever. It's not necessarily because that lovely, heart-shaped summer held its own fair share of low points that I was anxious to escape -- because it did -- but because, right now, I am curled up in the living room, listening to the end-of-summer winds creak and blow frantically outside and feeling like, for the first time since childhood, I really did do everything I wanted to do this summer. (Well, okay, nearly everything. As you may have noticed, I've not kept up with any of you, my dear readers. This I do truly regret!). Genuine apologies aside, I'll now ask myself to compile a summer checklist: Adventures? Check! Projects? Check! Eat all the tomatoes? Check!
See? I did it all! Honestly, though? It was a summer I would do all over again in an instant. It helps, I think, that I had a splendidly incredible, excited, eager, happy, and adventuresome partner through it all. Perhaps it's the Eagle Scout in him, but Andy tends to really love all the seasons and, well, the world tends to make him really happy, which I admire endlessly. All that, and, well, have you noticed that it's going to now be FALL? Fall! Which might just be (dare I say it!) a better season than summer. The sweaters, the apples, the coolness, the crunchiness, the air, the pumpkins, the hot drinks, the scarves, the soup, for crying out loud. The soup!
Summer, thank you. Autumn, it's finally your turn! New adventures are being born!
(Soup and other autumnal adventures are now officially beginning. Stay tuned, friends. Stay tuned.)
Subscribe to:
Posts (Atom)