Sunday, April 25, 2010

The Facts and Fictions of Cheesecake

Have you heard the word on the streets? I made my very first cheesecake! And let me tell you, dear reader, it's nothing short of a miracle.

To start with, I have absolutely no idea what took me so long to make this thing. (Sheesh, do I always say this, or what? I feel like my life is simply a series of long-awaited culinary miracles.) It's a fact that cheesecake is one of those things that tends to always be delicious, but is also a fact that it's so, so much better when it's homemade. And, honestly, it's not all that difficult. The preparation steps are simple: bring ingredients to room temperature (this is key!), mix well, and pour into pan. The trickier part is in the actual cooking. You know, the forty days and forty nights that your little cheese-baby spends in the oven, preparing itself for its very brief existence in this wide, wide world?

I have decided that I will tell you the truth, which is that I spent the whole cheesecake cooking time maniacally searching online for cheesecake cooking tips. Not even tips, really, but truths. There is a great deal of information out there about cheesecake-baking, and I think that most of it is sheer and utter nonsense. Some of the ideas I've heard are ridiculous, like don't you dare eat the cheesecake until it's been in the refrigerator for twenty-four hours and cracks in a cheesecake mean that you're an idiot. Mainly, there's a lot of very fussy cheesecake tutorials out there and, before you waste your time, let me tell you this: avoid them! Avoid them at all costs! They will just make you really nervous and then you will open up the oven over and over, trying to decide if it's done yet, and jabbing at it and shaking it and trying to determine how jiggly is too jiggly. In the meantime, the cheesecake gets confused and may decide to give up on you altogether, in which case sadness will sweep through the kitchen, as you cry into the sad, runny cheesecake innards that you are eating with a spoon, pretending you don't care that cheesecake came to attack you and destroy all your dreams.

Okay, so this did not happen to me, but I pictured this scene -- me and my ruined cheesecake, trying to enjoy each other, then ultimately calling it quits and breaking up altogether in order to avoid further embarrassments. I did, however, open up the oven nine thousand times, trying to figure out if it was done yet. Finally, I think I just got lucky. It never cracked, and it started to look a little golden brown on the top. It jiggled around a little, but not too much. The aluminum foil appeared to be doing a terrible job as a barricade, and I think I might have just ended up taking it out of the oven just because the water issue was so nervewracking. How can it possibly make sense to bake a cake inside a pool of water? Who came up with that ridiculous idea, anyway?

This whole cheesecake thing started because, well, I've had cheesecake intentions for quite some time. M and I have always talked about cheesecake, even though we rarely eat it (ahem, until, ahem...recently) and long ago we had schemes of making cheesecake with our own bare hands. This dream went far enough that I actually got him some springform pans for a gift, although that was probably a good seven years ago, and they gathered a great deal of dust -- up until now, anyway.

Enough with the history lesson, though. Off you go, then! Get on it. And because I care about you and your cheesecake fate, I will warn you properly: this is dangerous, this cheesecake. It is going to taste good, and you will try to avoid it, but it will be impossible. It will call you to like a siren, and you will find yourself eating it at all times of day. In order to avoid this, I recommend freezing half of it (it this even realistic?) or giving some away (okay, that's even more unrealistic). Okay, so at least go into it knowing full and well that it, this little cheesecake, will have full control over your every move. That is, until you've eaten it all up. And then, of course, YOU are the winner.


The Simple, Perfect, Ultimate Cheesecake
adapted from the Better Homes and Gardens Cookbook
  • 2 cups finely crushed graham crackers
  • 1/4 cup ground or finely chopped almonds
  • 1/3 cup sugar
  • 1/2 cup butter, melted
  • 3 8-ounce packages cream cheese, softened
  • 1 cup sugar
  • 1 teaspoon vanilla
  • 1/4 cup milk
  • 3 eggs, room temperature & lightly beaten

Preheat oven to 375F. For crust, in a medium bowl stir together crushed graham crackers, almonds, and the 1/3 cup sugar. Stir in melted butter. Press the crumb mixture onto bottom and about 2 inches up the sides of an 8- or 9-inch springform pan.

Place the crust-lined springform pan on a double layer of heavy-duty aluminum foil. Bring edges of foil up and mold around sides of pan to form a watertight seal.

For filling, in a large mixing bowl beat cream cheese, the 1 cup sugar, and vanilla with an electric mixer on medium speed until combined. Beat in milk until smooth, scraping down sides constantly. Beat in eggs. Pour into crust-lined pan. Place in a roasting pan and pour enough hot water around pan to reach halfway up the sides. Make sure the sides of the cheesecake pan are higher than the sides of the roasting pan, and aim for at least an inch of space around all sides of the cheesecake pan.
Bake in the preheated oven for 40 to 45 minutes for the 8-inch pan (35 to 40 minutes for the 9-inch pan) or until edges of cake are set but center jiggles a bit when pan is gently shaken. (I ended up needing to bake mine for about an hour, I think, and I read somewhere that the toothpick-in-the-center trick for normal cakes also works with cheesecakes, so I used that method. The recipe also suggests turning off the oven and letting the cheesecake cool for about an hour inside the oven, but I was itchin' to get it out of the water bath, so I just took it out of the oven immediately. As it turns out, I was right to be nervous about that stinkin' water bath, because the water had somehow soaked into the aluminum foil, and therefore into the pan, and therefore into the crust of the cheesecake.)

Cool in pan on a wire rack for 15 minutes. Using a small sharp knife, loosen the crust from sides of pan; cool for 30 minutes. Remove the sides of the pan; cool cheesecake completely on rack. (This the point where I discovered that the crust had gotten wet, although it didn't really seem too damaged, and it dried out a little as the cheesecake cooled.)

Cover and chill at least 4 hours before serving. Or, if you like warm cheesecake (seriously, is there any temperature of cheesecake that's bad?) then serve some to yourself straight away. It's okay, do it! I said so.
Sunday, April 18, 2010

I Dream of Gluten

I'm conducting an experiment.

The experiment is called Life Without Gluten and, yes, it's a bit of a nightmare. Okay, so "nightmare" is a total exaggeration. It's really not terrible. It's interesting, mostly, and I feel much less shakiness, crankiness, and anger at the world than when I first went vegan, or that time I thought it'd be interesting to cut out sugar completely, or when I tried to remove all carbohydrates from my life. Or the raw foods experiment, or the cleanses that I've tried (which, I'm completely convinced, result in a removal of your soul, not toxins), or even the experiment in which I tried to cut out coffee (does it count as an experiment if it only lasts ten hours?).

It began this week, on Wednesday and, look, it's Sunday and hardly anyone has suffered from my gluten test so far! My good friend Aimee was in town this past week, and we went with a big crew to The Publican for a trillion courses of meat, with some vegetables and beer thrown in for good measure. Going to a beer-focused restaurant is a little funny for me, since I have what I lovingly call a "beer condition," but I was happy just focusing on the meat showcase. (If you'd like to know, I don't drink beer because of its really strange effects on my body, including but not limited to: congestion, runny nose, instant headache and over-the-top bloating of fingers and toes, the feeling of my intestines being twisted into elaborate knots, scratchy throat, watery eyes, and the feeling of blood pumping all too quickly in my veins.) Anyway, Aimee and I got to talking about beer, and how it affects us both similarly. We talked about whether or not it was gluten that caused the problem, but I was adamant in pointing out that other gluten-things don't have that effect on me. The Other Gluten likes to live in my body, right? Right?

Aimee and I talked about a two-week stint of gluten-free life that she had, and how she felt really amazing the whole time, unburdened by wheat's overbearing gluey presence in her body. It was this, coupled with the fact that I felt really great after eating a meal comprised of just meat and vegetables, that made me think as I was driving home from dinner, what if I tried to cut out gluten? One month! I thought. Which then turned into well, maybe 2 weeks. Which turned into okay, 1 week. Now that I am merely on day 5 of the gluten cleanse, I am wondering if this week could please, please speed up.

Don't get me wrong, I feel pretty great. And I have an incredible new-found respect for folks who are gluten-free because they have to be, whether it's because of Celiac disease, an allergy, an intolerance, or some other medical condition. It's not easy. I suppose it's something that you just get used to if you have to, like any other dietary withholding plan, but, still. Gluten is everywhere. Gluten is especially everywhere in my cooking repertoire, because, in case you didn't know, I sort of have this love of bread. You know, bread. With flour in it. Agh, something as amazing as good bread, or a good pastry, or pasta, for crying out loud -- how can these things be so lovable, yet so evil at the same time? Hence, you know, the nightmare. The big, bad, gluten nightmare.

In honor of gluten-free week, I've decided to share a gluten memory with you, so that I may live vicariously through the description. I first made this recipe about a month ago, and it knocked my socks off. If you're a Bon Appétit reader, then you saw this recipe in the last issue: pop tarts. It's rare that I read a recipe in a magazine and immediately run with it into my kitchen, madly tossing everything aside so that I can create it as soon as humanly possible. In fact, I don't think it's ever happened before. You know, you fold down the corner of a page, or you put in a post-it note, or you tear out the page and think, this will be good to make some day. Rarely do recipes make me stand up and head into the kitchen, but this, I knew, was special.

I had sort of an obsession with pop tarts during my freshman year of college, they being one of the ultimate convenience foods and all, and I collected all the box fronts and adorned the wall of my dorm room with them. If this sounds like an exquisite interior decorating approach, you are correct. It was. It was also rooted in that collecting fever that college kids get -- you know, the empty liquor bottles lined up in every college boy's house, or the beer can tower at the college party -- and this was my version, my way of proving my consumption, I suppose, and my "adult" choices. Accordingly, by sophomore year I was pretty burned out. After college, I realized that pop tarts were disgusting (very few things are disgusting when you're in college -- have you noticed this?) and I found the Nature's Path organic, non-chemical variety (the "toaster pastries"), but never really thought they were all that delicious -- just convenient, mainly.

I thought and thought about creating a pop tarts recipe, but never really got around to it, which was precisely why I was so thrilled when I came across my homemade pop tart dream, plastered on the pages of Bon Appétit. The recipe sounds like a pain and (I won't lie) it's not the easiest thing you'll ever make, but it will be worth it. Once you get the hang of it, it won't seem half as bad, kind of like when you realize how ridiculously easy and fast it is to make pie crust or pizza dough -- after you've made it 4 or 5 times, you wonder why you spent so long not making it. This pop tart recipe only makes eight pastries, but the great thing is that you can double it and freeze them in an airtight container for a few months (though I bestow upon you honors if you can make them last that long) and have them ready to bake at a moment's notice.

The recipe also suggests dusting them with powdered sugar at the end, although I have this unnatural aversion to the consumption of powdery things, so I opted for a glaze, which, ultimately, makes them more like "real" pop-tarts anyway. Although, in writing that, I sort of wince, squint, and tilt my head all at once, thinking that this new version, well, this is the real pop tart. Chock full of gluten, sugar, and sweet, sweet love, this is what every pop tart should be.

Unbelievable, Life-Changing Pop Tarts
adapted from Bon Appétit magazine

2 cups plus 2 tablespoons all purpose flour plus additional for shaping and rolling

1 teaspoon kosher salt

1 teaspoon sugar

1 cup (2 sticks) chilled unsalted butter, cut into 1/2-inch cubes

4 tablespoons ice water

12 tablespoons jam or preserves
(any flavor! I used a combination of strawberry and apricot.)

Whisk 2 cups plus 2 tablespoons flour, salt, and sugar in large bowl. Add butter. Using fingertips or back of fork, blend in butter until mixture resembles coarse meal. Add ice water by tablespoonfuls, tossing until moist clumps form. Gather dough into ball. Divide in half; shape each half into disk. Wrap in plastic. Chill at least 1 hour.

Line 2 large rimmed baking sheets with parchment. Working with 1 disk at a time, roll out dough on floured surface to about 13x11 inches. You might want to roll it while it is in the plastic wrap -- I found that it cracks less when you do it like that. I then folded in the sides in order to make a rectangle shape.
Cut into eight (roughly) 5x3-inch rectangles.
Arrange 4 rectangles, spaced apart, on each sheet. Spoon 1 1/2 tablespoons preserves in row down center of each rectangle.
Top preserves with second dough rectangle. Using fingertips, gently press all edges of each tart to seal; press all edges with tines of fork to double-seal. Using a toothpick, poke a few holes in center of top dough rectangle.
Cover; freeze tarts on sheets at least 2 hours and up to 1 week.
Position 1 rack in top third and 1 rack in bottom third of oven and preheat to 375°F. Bake frozen tarts uncovered until golden, reversing sheets after 15 minutes, 25 to 30 minutes total (some preserves may leak out). Immediately transfer tarts to rack. Cool slightly, then whisk up a thick glaze of powdered sugar, milk, a tiny pinch of salt, a little vanilla, and some lemon (or orange) zest. Spoon glaze over the pop tarts and let it set for a little while -- but not too long, because the pop tarts are definitely best when they are still warm.

These pop tarts are delicious for a snack, or for a dessert. They can be eaten for breakfast, although you may want to ditch the glaze if you're having them in the morning, as the glaze makes them pretty sweet. They are really, really terrific with a cup of coffee, or an espresso. They are just really, really terrific in general. They will make you sort of sink into your seat and murmur loving coos of pleasure to no one in particular, and that, I think, is a sure sign of deliciousness, gluten or not.

Thursday, April 15, 2010

The Newest Tragedy


Note to self:
Top shelf of refrigerator is very, very cold. Still.
Top shelf of refrigerator might actually be colder than the freezer.
Frozen asparagus is pretty much just as sad as frozen celery.
Frozen asparagus does not taste as delicious as frozen asparagus.
Remaining asparagus-hole ice bits are sort of fun to play with.

Note to asparagus:
I'm really sorry.

Sunday, April 4, 2010

Beautiful Beast


I want you to know that I've done it.

I've found the best bread recipe ever. I am not exaggerating. I swear, I'm not. If you want to be really, incredibly proud of yourself, then you should make this bread. If you want to impress anyone who isn't you, then make this bread. If you are in the market for a new friend, or a new, ahem, special friend, or even if you want to make amends with someone you've been quarreling with, then you need to make this bread. In fact, I see no reason at all why you shouldn't make this bread immediately.

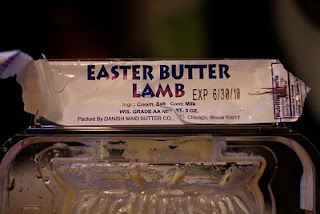
Look at it this way: this bread requires a mere three ingredients, four if you count water. You might have all these ingredients in your pantry right now. Flour, salt, yeast. That's it! Even if you have made bread a million times before, you will be amazed by the alchemy. Remember, bread is magic! First, it's dry nothingness, then it's wet slop, then you cover it up (because you are so disgusted with it, of course), and then, the next thing you know, it has morphed into a miracle ball of magical wonder. It's so ballooned-out in perfect roundness that you hardly can bear to touch it, let alone put it in the hot, hot oven. But then, you must put it in the oven, of course, because that is when the second wonder takes place. Suddenly, you've done it! You've made a perfect, crusty miracle-loaf. Oh, and that Easter Butter Lamb that somehow made its way into your shopping basket at the market the other day? (Only $1.49!) Now is the perfect time to make use of it. You will not be sorry. You just won't.

Granted, this loaf requires some waiting time. You may get antsy. It's worth it, though. The first rise is, according to the original recipe, 12-18 hours. This sounds like a lame and very long time, but just do a little math ahead of time so that you can let it nestle into your schedule. I got home from work on Friday night at 11:30 pm, mixed the dough a bit later on, and it was starting its first rise at 12:50 am. By the next afternoon at about 2:00 pm, I went at it again, and the bread was ready by dinnertime (okay, I'm lying, it was done by, um, snack time). I would also be lying if I said that we did not eat half of the loaf for a snack. Thus, there is a pretty good reason that we didn't eat dinner until 10:00 pm (which may or may not have also had to do with the fact that, last night, we used the grill for the first time this season and ended up having to marinate the flank steak for way longer than we thought we'd need to and it was windy and there was fire everywhere and the steak kept being rare and we are really not rare-steak people.) Really, though, isn't it a sin (or at least a disgrace) to not eat the bread while it is hot from the oven? It is, really, the finest pleasure in life. And you, dear reader, need to have pleasures. That is a fact.

The Best-Ever, Incredibly Incredible No-Knead Bread

Adapted from the New York Times' adaptation of the Jim Lahey/Sullivan Street Bakery recipe
with special thanks to Dawn, who introduced me to this loaf on Friday night

yield: one 1 1/2 lb. round loaf

3 cups all-purpose, plus more for dusting
¼ teaspoon yeast
1¼ teaspoons salt

In a large bowl combine flour, yeast, and salt. Add 1 5/8 cups water, and stir until blended. Alert, alert! Dough will be shaggy, messy, and sticky. Cover bowl with plastic wrap. Let dough rest at least 12 hours, or up to about 18, at warm room temperature, about 70 degrees. You will know the dough is ready when the surface is dotted with little bubbles. (Mine was ready after about 13 hours.)

Lightly flour a work surface and pour dough on it.

Sprinkle it with a little more flour and fold it over on itself two or three times. Leave it on your work surface, and cover loosely with plastic wrap. Let rest about 15 minutes.

Using just enough flour to keep dough from sticking to work surface or to your fingers, gently and quickly shape dough into a ball.

Generously coat a cotton towel (not terry cloth) with flour. Put dough seam side down on towel and dust with more flour.

Cover with another cotton towel and let rise for about 2 hours. (After I covered the dough and left it to rise, we ran some errands and ended up getting back three hours later -- I was worried, but it was still totally fine!)

When the dough is ready, it will be a lovely little dough baby that has doubled in size. When you poke it with your finger, your indentation will stay in the dough.

At least a half-hour before dough is ready, heat oven to 450 F. Put a 6- to 8-quart heavy covered pot (cast iron, enamel, Pyrex or ceramic) in oven as it heats. When dough is ready, carefully remove pot from oven. Slide your hand under towel and turn dough over into pot, seam side up. It may look like a mess, but that is okay! Shake pan once or twice if dough is unevenly distributed; it will straighten out as it bakes. Cover with lid and bake 30 minutes, then remove lid and bake another 12-20 minutes, or until loaf is browned and sounds hollow when you thump on its top with your knuckles.

Cool on a rack for about 20 seconds, because that is as long as you can possibly wait before eating it. On a cutting board and burning your fingers off, slice with a serrated knife and spread with salted butter. (An animal-shaped butter is preferable, but, really, any good butter will do. And for crying out loud, don't abuse this perfect loaf by slopping some margarine on it.)